Buzz Out Check
This is where you physically verify audio before recording. Paper routing plans are great, but cables don’t always cooperate.
Purpose
Section titled “Purpose”Buzz Out lets you systematically listen to each audio assignment and mark it off.
The typical workflow:
- Complete your routing configuration in Nipper
- Start the Buzz Out check
- Choose your verification mode (Audio-Centric or Video-Centric)
- Your engineer physically listens to each source or destination
- Click individual blocks or use bulk actions to mark verification status
- Navigate through all items using Previous/Next or Jump to Next Unverified
- Record who completed the check for documentation
This catches the problems that paper checks miss - wrong cable connected, incorrect patch panel routing, equipment failure, phantom power issues. The usual suspects.
Starting Buzz Out Check
Section titled “Starting Buzz Out Check”Menu → Tools → Buzz Out Check
(Or keyboard shortcut: Cmd+Shift+B / Ctrl+Shift+B)
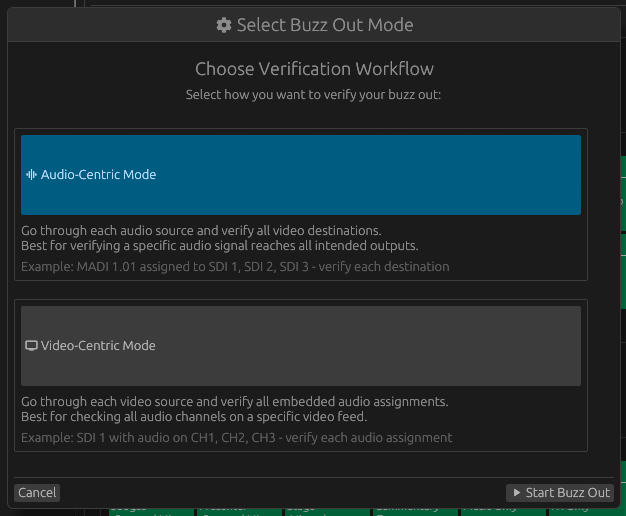
A mode selection dialog appears. Choose your verification workflow:
Audio-Centric Mode:
- Go through each audio source and verify all video destinations
- Best for verifying a specific audio signal reaches all intended outputs
- Example: MADI 1.01 assigned to SDI 1, SDI 2, SDI 3 — verify each destination
Video-Centric Mode:
- Go through each video source and verify all embedded audio assignments
- Best for checking all audio channels on a specific video feed
- Example: SDI 1 with audio on CH1, CH2, CH3 — verify each audio assignment
Select your preferred mode and click “Start Buzz Out” to begin.
Your mode selection is saved and remembered for future sessions.
Configuration Change Detection
Section titled “Configuration Change Detection”If you’ve previously run a Buzz Out check and then modified your routing configuration, Nipper detects this when you start a new check.
A warning dialog appears offering two options:
Clear Results and Start Fresh:
- Resets all verification statuses to pending
- Clears the completion record
- Recommended when assignments have changed significantly
Continue with Existing Results:
- Keeps previous verification data
- Useful when changes are minor or unrelated to already-verified sources
- Lets you resume where you left off
Nipper tracks changes by monitoring:
- Audio source assignments to video destinations
- Muted/unmuted status changes
- Addition or removal of sources or destinations
This prevents confusion from outdated verification results after routing changes.
Verification Process
Section titled “Verification Process”The Buzz Out window displays differently based on your selected mode:
Audio-Centric Mode
Section titled “Audio-Centric Mode”In this mode, Nipper presents each audio source sequentially. Only assigned, non-muted audio sources appear in the list.
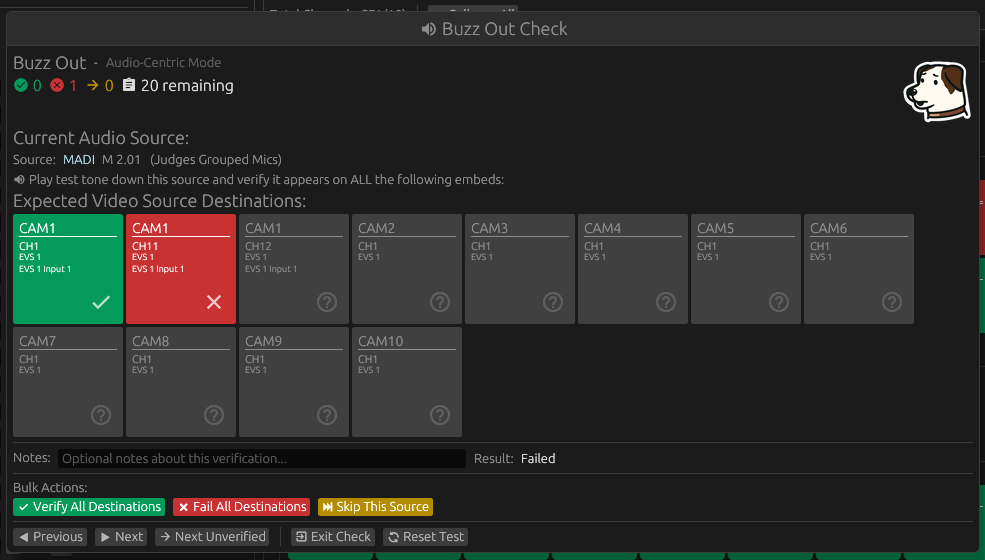
For each audio source, the display shows:
- Audio source label (like “MADI 1.05 L”)
- Audio source type and description
- A grid of visual blocks representing all video destinations where this audio is assigned
Each video destination block shows:
- Video source name (e.g., “CAM1”)
- Audio channel assignment (e.g., “CH1”)
- Video group name (if applicable)
- Location information (for NDI/IP sources)
- Verification status indicated by color and icon
Click any destination block to cycle through verification states: Pending (?) → Verified (✓) → Failed (✗) → back to Pending.
Action buttons let you verify all destinations at once, fail all, skip all, or navigate between audio sources.
Video-Centric Mode
Section titled “Video-Centric Mode”In this mode, Nipper presents each video source (SDI channel) sequentially. All video sources appear in the list, even if they have no audio assignments.
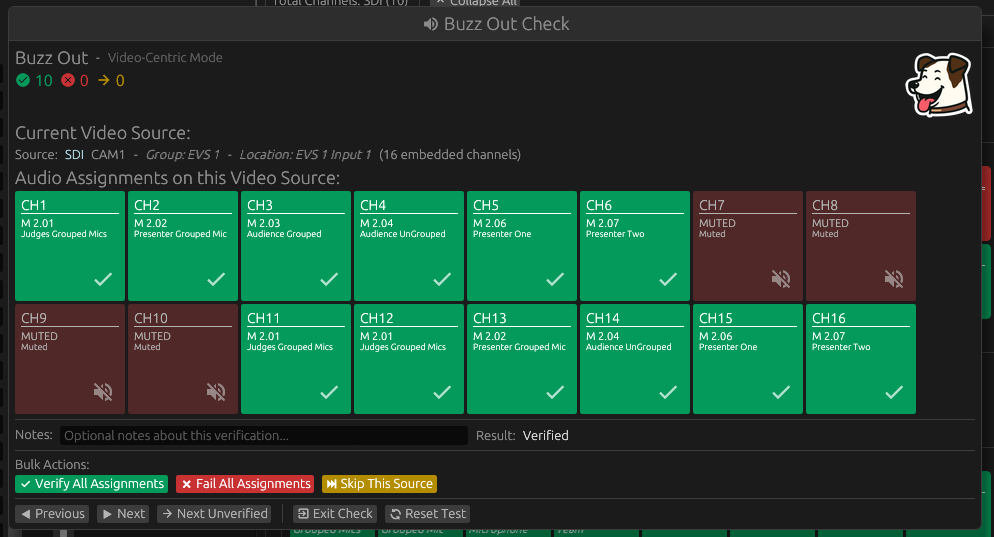
For each video source, the display shows:
- Video source name and type
- Group name (if applicable)
- Location information (for NDI/IP sources)
- Count of assigned channels (e.g., “4 of 8 channels assigned”)
- A grid of visual blocks representing all audio channel assignments
Each audio assignment block shows:
- Audio source label (e.g., “MADI 1.01 L”) or “MUTED” or “Unassigned”
- Audio channel slot (e.g., “CH1”)
- Audio source type
- Verification status indicated by color and icon
Note: Muted and unassigned channels are displayed but automatically marked as verified since they don’t require physical verification.
Click any assignment block (except muted/unassigned ones) to cycle through verification states: Pending (?) → Verified (✓) → Failed (✗) → back to Pending.
Action buttons let you verify all assignments at once, fail all, skip all, or navigate between video sources.
Status icons:
| Icon | Status | Description |
|---|---|---|
 |
Verifying | Currently verifying this source |
 |
Complete | All verifications complete, no failures |
 |
Errors | Errors or failures detected |
 |
Pending | Check not started or incomplete |
Block colors indicate verification status:
- Gray (Pending) — Not yet checked
- Green (Verified) — Confirmed working correctly
- Red (Failed) — Problem detected
- Orange (Skipped) — Omitted from current check run
A timestamp is recorded automatically when each item’s status changes.
Verification States and Actions
Section titled “Verification States and Actions”Each item (destination in Audio-Centric mode, or assignment in Video-Centric mode) can be individually verified by clicking its visual block.
Per-item verification:
- Click a block to cycle: Pending → Verified → Failed → Pending
- Each block maintains its own state
- Hover over any block to see detailed information
Bulk actions: The action buttons affect all verifiable items in the current assignment:
- Verify — Mark all items as Verified and advance to next
- Fail — Mark all items as Failed and advance to next
- Skip — Mark all items as Skipped and advance to next
In Video-Centric mode, muted and unassigned channels are excluded from bulk actions as they don’t require verification.
Notes field:
Document observations about the current source:
- “Missing on SDI 3, channel 5”
- “No ready”
- “Verified correct content”
Notes are saved per source and appear in exports.
Persistence
Section titled “Persistence”Verification results are automatically saved to your configuration file as you mark items (requires an active license and existing file path).
Each individual item’s verification status is persisted:
- Audio-Centric mode: Each destination’s status for each audio source
- Video-Centric mode: Each audio assignment’s status for each video source
Opening a saved configuration resumes Buzz Out state:
- Previously verified items remain verified
- Failed items still marked failed
- Skipped items preserved
- Notes retained
This allows verification over multiple sessions and supports collaborative workflows where different engineers verify different sections.
Navigation
Section titled “Navigation”Sequential:
- Next button advances through list (moves to next source regardless of verification state)
- Previous button goes back
Jump to Next Unverified:
- Skips sources where all items are verified, failed, or skipped
- Goes directly to next source with pending items
- Efficient for resuming interrupted checks
Progress indicator:
Top of window shows:
- ✓ Verified count (number of fully verified sources)
- ✗ Failed count (sources with any failed items)
- → Skipped count (sources where all items are skipped)
- Remaining count (sources not fully verified)
The Nipper mascot icon changes based on overall progress:
- Listening (verifying): Check in progress
- Happy: All complete, no failures
- Worried: Errors or failures detected
- Normal: Check not started or incomplete
Completing the Check
Section titled “Completing the Check”The check is considered complete when all verifiable items are verified or explicitly handled:
- Audio-Centric mode: All audio sources have all their destinations verified, failed, or skipped
- Video-Centric mode: All video sources have all their assigned audio channels verified, failed, or skipped (muted/unassigned channels don’t block completion)
When you click Next on the last source with all items complete, Nipper prompts: “Enter name of technician who completed verification.”
Enter the name, click OK, and the completion timestamp and name get recorded in the configuration.
If items remain pending when you reach the end, you’re shown a summary instead of the completion prompt.
Export Status Badge
Section titled “Export Status Badge”The Buzz Out status badge appears in HTML/PDF exports showing:
- Completed (green) — All verifiable items checked, technician name shown
- Incomplete (yellow) — Some items still pending
- Errors (red) — Failed verifications exist
The badge provides at-a-glance verification status for production documentation.
Resetting Buzz Out Results
Section titled “Resetting Buzz Out Results”Within the Buzz Out Check dialog, the “Reset Buzz Out” button clears:
- All verification statuses back to pending (for all items across all sources)
- Completion technician name and timestamp
- Notes are preserved unless you explicitly clear them
Use this when:
- Re-checking after equipment changes
- A different technician needs to verify the same routing
- Performing a pre-event final verification before going live
- Switching between verification modes to start fresh
After resetting, the check automatically restarts with all items marked as pending.
Choosing the Right Mode
Section titled “Choosing the Right Mode”Use Audio-Centric Mode when:
- You want to trace a specific audio signal through the system
- You’re troubleshooting where a particular microphone or source goes
- Your workflow involves testing one audio source at a time with tone
- You need to verify that one audio source reaches multiple destinations
Use Video-Centric Mode when:
- You’re checking all embedded audio for a specific video feed
- Your workflow involves monitoring one video output at a time
- You need to verify all audio channels on specific cameras or sources
- You’re confirming complete audio embedment for each SDI/NDI output
Both modes save to the same underlying verification data, so you can switch modes between sessions without losing progress. The mode you select is remembered for your next Buzz Out session.