
Clip Editor & Markers
The clip editor is where you define which part of an audio file plays and how it loops or skips. Open it by right-clicking a clip and choosing Edit Clip — Clip Settings opens on the Editor tab by default.
The Editor Layout
Section titled “The Editor Layout”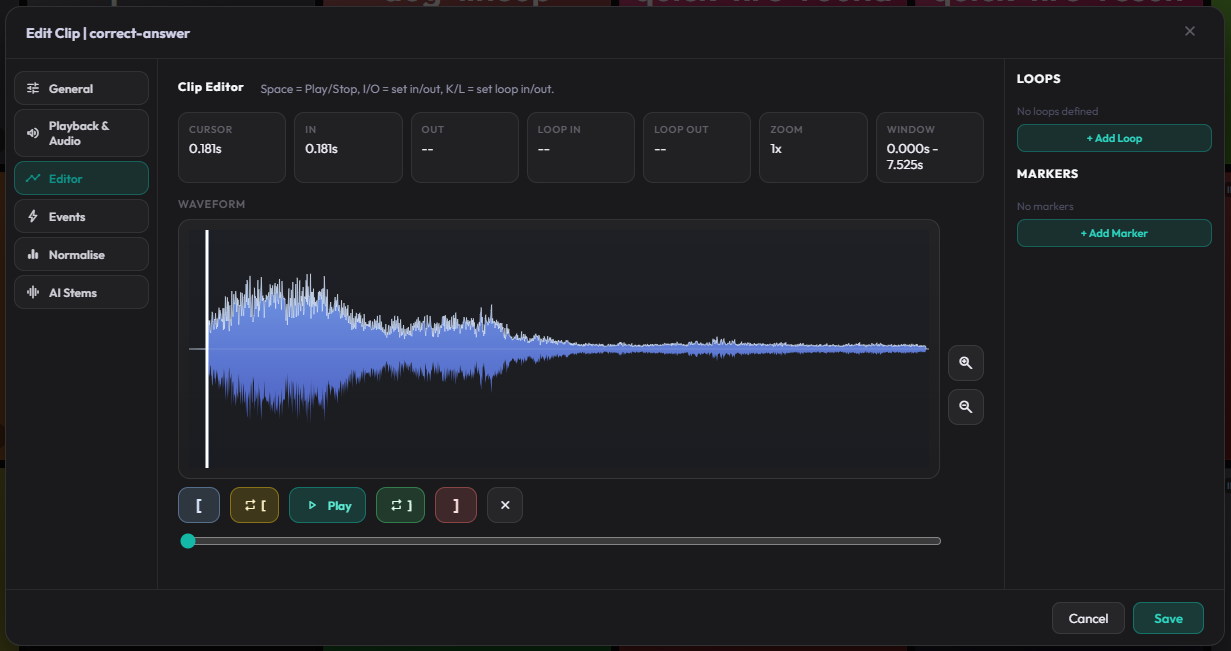
The editor window has three main areas:
- Waveform display (centre) — shows the audio waveform with markers and highlighted regions.
- Toolbar (below waveform) — buttons to set markers, add loops/skips, and preview.
- Side panel (right) — lists existing loops and skips, and edits the selected loop’s exit action or skip’s jump target.
The Waveform View
Section titled “The Waveform View”The waveform shows:
- IN marker (blue line) — playback starts here.
- OUT marker (red line) — playback ends here.
- LOOP IN (yellow line) — proposed start of a new loop block.
- LOOP OUT (green line) — proposed end of a new loop block.
- SKIP IN / SKIP OUT (red-shaded region) — proposed skip block.
- Playhead (white line) — current cursor position.
- Custom markers — Jump (purple, labelled “J”), SkipStart (orange, labelled “S”), SkipEnd (orange, labelled “E”).
- Loop regions — yellow-shaded areas.
- Skip regions — red-shaded areas.
Click or drag anywhere on the waveform to move the playhead. The playhead position is used when you press the marker buttons or keyboard shortcuts.
Drag-to-select: drag across a range of the waveform to select it, then use the selection to create loop or skip blocks directly — a fast way to mark up a file without positioning the playhead twice.
Grab handles: IN/OUT, LOOP IN/OUT, and SKIP IN/OUT are each grabbed by their small triangular handle in the band just below the waveform box, not by the colored line inside it — the line is a visual reference only. The playhead has its own handle in the band just above the box. Drag a handle left/right to move that marker; the loop/skip region highlight updates live as you drag. While a clip plays, the loop/skip cards follow the playhead and you can edit the active block live.
Zoom and Scroll
Section titled “Zoom and Scroll”- Use the Zoom In / Zoom Out buttons on the right of the waveform.
- Use the scroll bar below the waveform to move through long files.
- Zoom centres on the current playhead position.
Setting IN and OUT Markers
Section titled “Setting IN and OUT Markers”Move the playhead to where you want the marker, then:
- Press I to set IN.
- Press O to set OUT.
- Or click the [ and ] buttons below the waveform.
- Click the clear button to remove both IN and OUT.
Use IN/OUT for:
- Removing silence from the start or end of a file.
- Playing only the best take from a longer recording.
- Creating a precise sting from a full song.
Loop Blocks
Section titled “Loop Blocks”A loop block repeats a section of audio. To create one:
- Move the playhead and set LOOP IN (
K) and LOOP OUT (L). - Click + Add Loop in the side panel.
- The new loop appears in the Loops list.
- Select the loop in the list to edit its Exit Action.
The editor uses the LOOP IN/OUT positions first, then IN/OUT, then playhead + 2 seconds when adding a loop.
Loop Exit Actions
Section titled “Loop Exit Actions”When you press stop while a clip is looping, the selected loop’s exit action controls what happens:
- Continue — play the tail of the clip after the loop ends.
- Crash Stop — stop immediately.
- Stop in Loop — stop within the loop while honouring fade-out.
- Stop — fade out from the trigger point and stop when the fade completes.
- Jump → Marker — jump to a named marker and continue playing.
- Jump & Pause → Marker — jump to a named marker and pause.
- Jump to Loop — jump to another loop block and continue looping. Shown in the UI as Loop → {name} once a target loop is chosen.
Loops repeat indefinitely until stopped or until the exit action fires. Loops play seamlessly — Callie Grams pre-renders a short crossfade across each loop boundary, so the turn has no click or gap.
Boundary preview: when auditioning a loop, the editor previews about a second of audio around the loop Out point (wrapping back to the In point) so you can hear exactly how the seam sounds. Skip blocks get the same boundary-preview treatment, and you can preview a skip boundary even while the playhead sits inside the skip region.
Releasing a loop during playback: clicking a clip that is currently looping releases the loop — playback follows the loop’s exit action instead of retriggering the clip.
Skip Blocks
Section titled “Skip Blocks”A skip block jumps over a section of audio during playback. To create one:
- Move the playhead and set SKIP IN (
U) and SKIP OUT (P). - Click + Add Skip in the side panel.
- The new skip appears in the Skips list.
Use skip blocks to remove verses, ads, or unwanted pauses without editing the original file.
Jump Target
Section titled “Jump Target”By default a skip block jumps forward over its region. You can also set a Jump Target on a selected skip to jump to a Jump marker instead.
Custom Markers
Section titled “Custom Markers”Custom markers appear as vertical lines on the waveform:
- Jump — a target for loop exit actions and skip blocks.
- SkipStart — beginning of a section to skip (used when creating skip blocks).
- SkipEnd — end of a section to skip.
Markers are created automatically when you add loops and skips. You can also add marker trigger rules in the Triggers tab of Clip Settings to fire actions when playback reaches a marker.
Preview
Section titled “Preview”Press the Play button or Space to preview from the current playhead position. If the playhead is inside a loop block, preview will loop that section.
Press Play/Space again to stop.
Keyboard Shortcuts in the Editor
Section titled “Keyboard Shortcuts in the Editor”| Key | Action |
|---|---|
I | Set IN marker |
O | Set OUT marker |
K | Set LOOP IN |
L | Set LOOP OUT |
U | Set SKIP IN |
P | Set SKIP OUT |
Space | Play / Stop preview |
Workflow Tips
Section titled “Workflow Tips”- Set IN/OUT first to define the playable region, then add loops inside it.
- Use the zoom control to place markers precisely.
- Name your Jump markers clearly — “Chorus”, “Drop”, “VO Start” — so jump actions make sense.
- Use Skip blocks instead of re-rendering files when the edit might change.
- Preview after every loop or skip change before saving.